Crispy Five Spice Pork Belly

Simple, versatile, but above all else, seriously satisfying. A crunch that will keep you coming back for more.
Share this recipe

About this recipe

Weekend or week night, it doesn’t matter. This recipe has the makings of a perfect, versatile lunch or dinner. Chop and change, and serve it how you wish. 

Before you begin

Note that this recipe calls for preparing the pork at least a day in advance. The key to a crispy pork belly skin is to make sure that the skin has had an ample of time drying out. 

Choosing your pork belly

If you’re using a vacuum sealed piece of pork belly

If your pork is within packaging, it would have retained a lot of moisture. For sure-fire results, you’ll want to dry it in the fridge for two days. However, if you don’t have the time, a day will do, just make sure you really keep an eye on the cooking time in the end. 

If you’re buying pork belly from your butcher

If you’ve bought your pork belly from your butcher, the meat will be slightly drier already. You could get away with drying in the fridge for about 3-4 hours (say you buy it in the early morning, dry it and make it for dinner) however, again for sure-fire results, dry overnight.

Pork rib bones in or out?

Honestly it doesn’t matter too much. If you include pork rib bones in, it means that you’ve paid for the weight. The dish doesn’t really benefit from having the bones in as it’s a low-and-slow cook. 

If you purchased with bones in, I’d suggest carefully slicing them off and saving it for a pork rib recipe or soup stocks. 

Pork belly fat content

When selecting your pork belly from the shelves or from your butcher, try to choose one that has a good ratio of fat to meat. The more fat there is, the longer I would recommend having the cook time. 

Varying the cook times

In the recipe, I’ve highlighted 1.5 – 2.5 hours of cook time. Now this is a pretty big window of variance. There are a few factors to consider.

How fatty is your pork belly?

If the ratio of your pork belly leans on the side of more fat to meat, you’ll want to cook closer to the 2.5 hrs. 

The fattier the piece, the longer it will take for the fat to render and become that delicious melty texture. If texture doesn’t bother you and you’re in a hurry, then see below.

Do you prefer soft and melty or firm pork belly?

The variance in the cooking time also depends if you prefer:

  • Pork belly that pulls apart and starts to melt in your mouth OR
  • A texture that is firm that holds its shape

It’s personal preference at this point. Rule of thumb is, start with 1.5hrs for a 0.5kg – 1.2 kg piece of pork belly and add 0.5hrs for every 0.5kg of meat . Add 1hr if you want soft and melty. 

Quick maths:

  • If you have a 0.5 kg piece, cook at 160C for 1.5 hrs 
  • If you have a 1.2 kg piece, cook at 160C for at least 1.5hrs, up to 2.5 hrs for melty texture
  • If you have a 2 kg piece, cook at 160C for at least 2.5hrs, up to 4.5 hrs for a melty texture

Then finish at high temperature for all scenarios

Cooking tips

Give the skin a chance to dry out

Pat it with a paper towel, salt, dry in the fridge overnight. Pat it with a paper towel again the next day. The secret to crispy skin is how you dry it. 

If you’re short on time, you may need to give the meat more time at the end at high temperature – however you run the risk of drying out the meat at high temperatures.

Skewer the meat with bamboo skewers

I add in bamboo skewers before I dry and remove them before I turn the oven up to hot temperature. Adding the skewers helps stop the meat from curling up during the cook. This is an optional step and really just for final presentation. 

Serve it with...

Crispy pork belly with vermicelli and nuoc cham

A classic. Chop up the pork belly and serve it alongside a vermicelli bowl, greens and nuoc cham. Or roll them into rice paper rolls and dip in nuoc cham. Serve with pickled carrot and daikon for balance.

Crispy pork belly banh mi

Slice open a fresh Vietnamese baguette, spread with kewpie mayo and chicken pate. Add in your pork belly, fresh coriander, green parts of a spring onion, picked carrot and daikon. Finish with a dash of seasoning soy sauce, white pepper and fresh birdseye chilli (if desired) and crunch your way through. 

Crispy pork belly with egg noodle (dry/soup)

Prepare some egg noodles according to the packaging instructions. Finish the noodle a dash of soy sauce, fresh birdseye chilli (if desired) and serve with boiled bok choy or choy sui. For a soup version, simply add the noodles to your preferred ginger-flavoured chicken stock and place the crispy pork on top with steam vegetables. 

Crispy pork belly fried rice

Have leftovers? It’s perfect for fried rice the next day. Toss it in the wok alongside your favourite fried rice ingredients. 

Plain white rice

Nothing beats simple – for easiest results, serve with a bowl of freshly cooked hot white rice with a soy and chilli dipping sauce. 

Check it out on Instagram

How to cook Crispy Five Spice Pork Belly

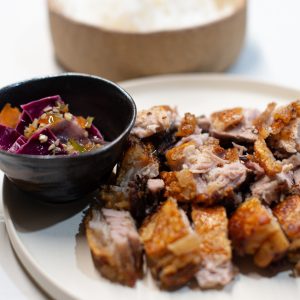
Crispy Five-Spice Pork Belly

A versatile dish - can be served with rice, vermicelli, rice paper rolls, banh mi - however you like to eat it!
Prep Time 30 mins
Cook Time 3 hrs
Fridge time 1 d
Total Time 1 d 3 hrs 30 mins
Course Main Course
Cuisine Vietnamese
Servings 4 people

Ingredients
  

  • 1.5 kg Pork Belly Rib bones in or off

Dry rub

  • 3 tbsp Five Spice Powder
  • 1 tbsp Garlic Granules Powder also ok
  • 1 tbsp Chilli Flakes Not powder
  • 1 tsp Salt Flay preferred

For the skin

  • 1 tbsp Salt Flaky preferred
  • 2 tbsp Neutral Flavoured Oil

For the oven

  • 5 pcs Whole Star Anise Do not use powder
  • 700 ml Boiling water from the kettle

Instructions
 

A day before cooking

  • Mix the spices together to form a dry rub. Pat the pork skin and meat dry. Flip the meat so it's skin side down and rub the spice-mix onto the meat-side, NOT the skin-side.
  • Score the pork skin by either slicing thin cuts about 3mm apart or stab the pork with the tip of the knife multiple times (be careful!). Once scored, salt the skin generously, and place on a tray in the fridge overnight to dry.
    See notes for butcher vs vacuum sealed pork.

The next day

  • Next day, take the pork belly out of the fridge. Pre-heat the oven to 160 C fan-forced while the pork belly comes to room temperature.
    Pat the top of the skin dry if you see moisture on top. If some salt gets removed, that's ok!
  • Place about 1 tbsp of neutral flavoured oil on the skin and spread around just on the skin.
  • In an oven tray, place about 5 star anise and pour in roughly 500-700ml of hot water from the kettle. The quantity doesn't matter, you just want to not have the water dry out as you cook. On a rack, place the pork belly on top, not touching the water. Check the pork from time to time and if the water has dried up, pour in more hot water.
  • Place the tray of hot water and pork belly in the oven, uncovered and roast for 1.5 - 2.5 hours. See notes re: cooking time.
  • After roasting, turn the oven heat up to 230-240 C (depending on how hot your oven can go) and roast on high temperature for about 20 minutes, checking the colour through the oven door to ensure it doesn't burn. It can take less or more time depending on how dry the skin got.
  • Once the skin has bubbled, become golden and crispy, remove the pork out of the oven and leave to rest at least 30 minutes.
  • Chop and serve. Tip cut so the crispy skin side is on the board, slice through the meat and use the force of your palm against the knife to force the knife through the crispy skin.

A big thank you to Southern Valley Meats for generously supplying me with meat to celebrate the opening of their newest direct-to-consumer retail store.

This post was not sponsored.

Share this recipe

Like this recipe? Please vote!

If you’ve tried this recipe or have a question, I’d love to hear from you. Leave a vote and a comment below. 

Leave a Reply

Your email address will not be published. Required fields are marked *

Recipe Rating


Did you make this recipe?

Don’t forget to tag @wining.dine.in or use the hashtag #winingdinein – I’d love to see!
Follow me on instagram to see videos on how to create this recipe and more.

Go to instagram